Overview
Stardust is an innovative Adobe After Effects plug-in for the creation of stunning particle and object based motion graphics and effects. It’s groundbreaking interface allows for combining 3D models, particles, effects and more, all existing and interacting in one shared space, enabling unparalleled integration between powerful tools delivering creative expression never before possible in After Effects. Make your vision come to life using 3D physics, Replica animation engine, 3D Model Library and hundreds of other features. Easily create complex effects using any of the hundreds of shipped presets, or build setups ground up using the modular workflow.
Stardust is fully integrated with After effects, you control every animation property right at the composition. It also includes many stunning effects like Replica , Black hole, a replicating particle effect, an effect that attracts particle as they age and more. You can have multiple emitters, particle types, forces, effects and more, all in one shared space 3D space, on a single After effects layer.
Main features
• Modular particle system for After Effects, multiple particle types, one 3D space.
• Create countless particle effects, such as fire, smoke, dust, snow.
• One click smart presets, that create impressive designs.
• Render and Animate 3D models.
• 3D Library – Nearly 200 textured 3D models loaded with a single click.
• 3D Volumetric Lights – Add atmospheric effects to your scene, respecting scene shadows.
• Many emitter types, from a single point, through live text, masks and 3D models.
• Physical Particles – Make particles and 3D models collide and interact with each other.
• Animatable 3D splines can emit particles.
• Space deformers: Sphere, Box, 3d Models, Bend, Twist, Maps, Black Hole and more. You can pull, push, displace and color the particles in many ways.
• ‘Replica’, a unique effect that replicates the particles in different ways, such as offset, linear, grid, corners and more.
First Steps
• Apply ‘Stardust’ to a solid layer from ‘Superluminal’ on the effect menu.
• To add a new node either click on the preset button on the main effect, or open the panel, click on a new node icon, and drag it.
You can now preview your animation.
Registration
Apply the Stardust effect, click ‘Register’ at the top of the effect, fill in the details, click confirm, and that’s it.
Still see the water-mark ?
Empty your disk cache and purge the image caches.
If that didn’t solve the issue, send us an email and we’ll get back to you asap.
User Interface
Main UI elements
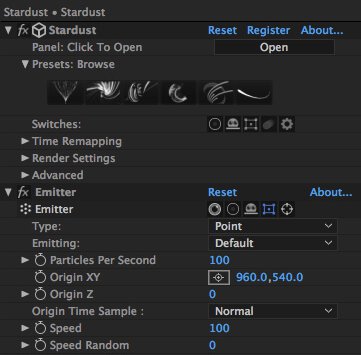
Stardust main effect – you can find it in the Effect menu under Superluminal Stardust. Here you set some global parameters.
Stardust Panel – you can either open it from the Window menu, or through the main effect. With the panel, you create, connect and delete nodes.
Controls – these are effect controls that are added when a new node is created in the panel. Here you set the node parameters.
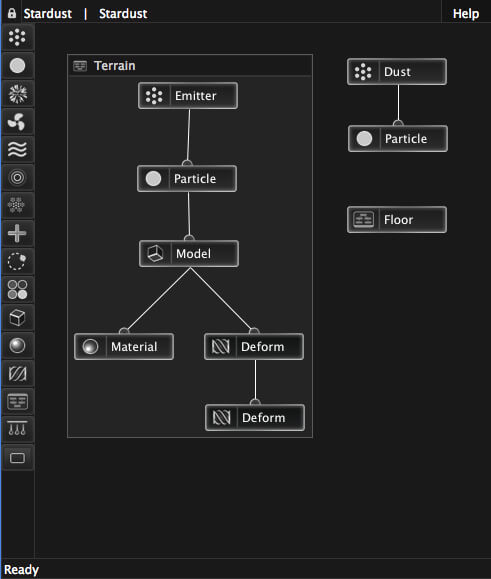
Basic concepts
A particle system consists of a minimum set of Emitter and Particle nodes connected together. Any force that is added could be either connected, and therefore affect only the connected branch, or free floating and this way it applies to all Particle systems in the space.
When you connect a force between the emitter and the particle it will affect the relevant properties upon birth of these particles. e.g. it will displace the birth position, rather then the over life.
Emitter node, generally speaking, is the producer of particles, and the Particle node, gives these particles their looks.
These properties are apply to several stages, some properties affect the particles upon birth, e.g. place of birth, speed and more,
and some properties affect the particles over life, like color, opacity and more, and then you can set in some cases properties over path, e.g. if you have a spline, you could apply a size over path to the particles along the resulting spline.
Then next phase for manipulating a particle properties, is through the other nodes, such as fields that can displace, color etc’ the particles.
Stardust effect
This is your starting point, this is the effect that actually renders. You apply it from the effect menu under Superluminal / Stardust over a preferably Solid layer or adjustment layer that matches the comp size.
You can set here some global parameters, such as motion blur, shading clipping etc’.
Main switches
Solo – Enables solo mode, when this toggle is on, only ‘Solo’ Nodes will be rendered
Smart Shy – Enable and Disables shy mode, when disabled, all nodes are visible in the effect controls window, when enabled ‘Shy’ nodes are hidden from the ECW, unless selected in the panel.
Helpers – An easy to access way to enable and disable the helpers, you can turn on and off helpers for each node with the node switches .
Motion Blur – An easy to access way to enable and disable the motion blur.
Preview – Enable / Disable preview, for fast rendering of 3D models.
Utilities – Open the utility window.
Panel
Click to open the stardust panel, or open it form the Window menu.
Preset
Entire effect presets, where you can either add or replace to the current tree.
With some preset you can load the optional Render Settings such as the Environment Layer and the Motion Blur.
Search Presets
You can search for a Stardust preset, to do so, please enter the search keywords in the search box.
You can search for keywords such as Fire, Grid, Fast, Dark, Replica etc’
Note: On a first search, Stardust may index for a few seconds if no such is found.
Save Presets
To save a Stardust preset, click the presets “save” button on the main stardust effect, located under the advanced menu. Using the opened dialog box, enter a name for the preset. user created preset should go to ‘User Presets’ Folder on a mac you can find it in Documents / Superluminal / Stardust / Presets / User Presets
Choose whether to collect files when saving a presets, this will copy the source footage and OBJ files for referenced layers by Stardust and place them in a folder next to the generated preset file. please be aware that Comps and materials within inner comps will not get collected.
You can also save Tags with the presets and some of Render settings such as the Environment Layer and Motion Blur.
When exporting a preset, the following get saved as well , with some limitations –
Solid Layers with Masks, limited to one mask per layer.
Footage.
Text Layers, without font / size attributes.
Lights. For 3D splines etc’ Light type will not be saved, as the info is for position only.
OBJ files.
Keyframes (linear only), and Expressions.
Time remap
Time remap the entire effect.
Render setting
Quality Settings
Choose favoring rendering quality or speed. Many tweaks are done behind the scenes to reflect this preference.
Render Output
Choose rendering different outputs, Depth channel, Ambient Occlusion, and more. This option works with 3D models only.
Preview
Render only some of the particles for a quick preview. This is a percentage parameter, so you view your animations more quickly with heavy setups.
3D Preview – Show 3D models as wireframes / flat / flat shaded for fast previews.
Helpers
Add visual cues to some nodes, you can a Spline constructing line, an OBJ outline, a Field bounding box and more.
Environment
Set an image for use with Image Based Lighting, if no layer is selected, the default colour is used. This option works with 3D models only.
Use the Mix Lights Shading to affect the Environment by the scene lights.
You can toggle the Environment to be visible in the background.
Ambient Occlusion
Add ambient occlusion shadows to the scene, you can control its radius, intensity and more. You can also enable Ambient Occlusion bilateral blur, to further smooth the result. This option works with 3D models only.
Motion blur
Apply a motion blur effect to the particles.
You can choose between a linear sample, which takes the first and last time samples, and interpolates them, or a sub-frame sample, which sample the exact time, gives more accurate results which is may be slower to compute.
Gain allows to tune the opacity of the particles, after the motion blur was applied.
Shadows
Add shadows to 3D models. To enable shadows, add casting shadows lights in the comp and have a casting and accepting shadows 3D models.
Threshold param allows to tune some shadow artifacts.
You can also tune the overall blurriness of the shadow using the Softness param.
Subsurface Scattering
Create materials with light scatter such as skin or wax. Enable this option to enable Subsurface scattering materials in the scene.
2D Renderer
Stardust will Auto switch to GPU when rendering Circle and Clouds particles types when deemed optimal. Can be manually overridden and set it to CPU.
Volume Cache
Volume cache options:
Off – No caching will be done.
On – Read and write cache, frames with no changes will be read from cache, new or modified frames will be written to cache.
Freeze – Read only, no writing or modifying of the cache, even if changes are made.
Cache Folder
Physical Particles – When turning Simulation on for the first time on each Stardust instance
Volume – For faster processing, Volumes can be cached. To enable caching, turn on “Volume cache”
Stardust will choose a folder on the same location as the project file. Hence, the project must be saved before a simulation can be generated. you can expose that folder by clicking ‘show’, or clear it (this will only clear the name, not the actual files) using the ‘reset’
Physics
These are the master controls for the physical simulation. Here, the simulation state, some of the physical world globals, cache and more are set. Please check the Physical section for more details.
Simulation
This param sets the state of the physical simulation generation. it has 3 modes:
● Off – there is no simulation and the particles are treated as non-physical.
● On – With this mode simulation is being generated and written to cache, either automatically on every change or by using the cache button.
● Freeze – the simulation is not being updated, but the last generated simulation state is being used. Changes can be made to parameters without the need to regenerate the simulation. It’s best to change only “appearance” parameters such as color, and not parameters which can affect the simulation outcome, such as particle birth rate. Changing such params may cause the animation to look inaccurate, as well as to cause the simulation to change entirely when going out of “Freeze” mode.
When the simulation is active, the following global controls can be set:
Auto Cache And Cache in/out Button
Changing some parameter values change the simulation and require regeneration. While the “Auto Cache” param is set to on, during parameter change the simulation cache for all frames earlier from the one currently being rendered will automatically be regenerated. When off, regeneration will happen only when rendering the frames sequentially from the first and onwards.
The “Cache in/out” button will automatically move the time cursor to the first frame, and trigger a “play” operation so that all the simulation frames will be cached sequentially. Useful when making edits without regenerating the simulation after every change.
Simulation Quality
Choose favoring simulation accuracy or speed. Several tweaks are done behind the scenes to reflect this preference.
Gravity
Sets the amount of gravity affecting physical particles.
World Scale
Sets the scale of the physical world. by default, 1 pixel equals 1 cm in world space.
Margin
Physical Engines need some margin for objects to collide, it is better whenever possible to keep the default margin, and then resize the object once the simulation is done, you could also lower this to get a smaller margin, but at the cost of a less stable simulation.
Z-Buffer
Use this param to obstruct particles by another 3D layer inside the Comp or by an external Z-Buffer, the input layer should be a lightness linear map. This option works with 2D particles only.
When using an external Z , you can set the black and white points to specific z values.
Advance Settings
Antialias
Sets the quality of texture rendering. for most cases the default setting should look good, but if you get some artifacts, you could set a higher value for better quality, or lower it for fast moving objects to gain extra rendering speed.
Cache Params
This param hints Stardust whether to try and pre-cache params with keyframes.
With short length setups, especially with Aux , turning it on may result in faster renders. Turning it off will get a more precise keyframe sampling.
Cache Hint
You can set a max cache hint. That may speed up some features. It’s used just as a hint for rendering system, so it won’t apply if not necessary, if you have lots of ram you can set a higher value to this parameter.
Stardust Panel
The panel can be found under the Window menu, or opened through the main effect. With the panel, you create, connect, disconnect, select and delete nodes.
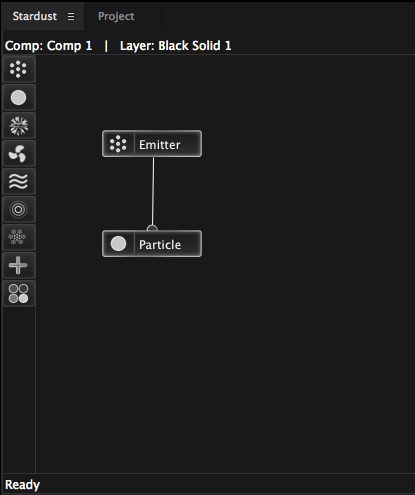
Nodes
You create a node either by click and drag from the panel toolbar or you can add them trough the preset browser.
Each node has a matching effect in the ECW(effects control window) to adjust it’s properties.
Status bar
Located at the bottom of the panel window, the status bar gives some useful info about the nodes.
Creating nodes
Either click and drag an icon on the panel toolbar, or open the preset browser and load node(s).
Contextual menu – Create Nodes from a dropdown menu when clicking on the panel.
Contextual menu – Create a group node from the currently selected nodes in the panel.
Selecting nodes
Click on a node to select it, and the matching control in the ECW will be brought into view with a green light indicator.
To select multiple nodes, click on empty space on the panel, and start dragging. A thick white line will appear. Selected nodes will also get selected in the ECW. When selected, you can move the nodes around, or press Backspace, and delete them.
You can also double-click on a node, and its relevant branch will get selected.
Connecting nodes
Click a connector on a node(That is the circle that appear when the cursor is over the node) , and drag it to another node. To disconnect nodes, click anywhere along the connecting line.
Auto connect node between nodes – drag a node on top of the connecting line between to other nodes until it turns green, to have it connect between them.
Detach node from between two other nodes – Alt click and drag it away. The two surrounding nodes will be connected directly automatically.
Multi connect nodes – Shift click a connector, and use the green link line to connect to multiple nodes.
Renaming nodes
To name nodes, change the name of the control in the ECW, the same way you change any AE effect name. the name will update in the panel.
Deleting nodes
Select a node(s) in the panel, and click ‘Backspace’, or select the controls in the ECW and delete.
Copy and Paste
Select the nodes in the ECW and do a normal copy/paste. you can also copy nodes from one Stardust layer to another.
View a layer’s Stardust setup on the panel
Right click anywhere on the panel to open a context menu, you can then choose another Stardust layer in the comp and view it on the panel.
Lock Button
You can either lock or unlock the Stardust panel to show the last Stardust selected layer.
Nodes
You can nodes to your setup either from the panel, or from the preset browser.
The following nodes are available, and each node’s controls are outlined in detail after the node list:
Emitter
Control the emitting properties, such as speed and direction.
Particle
Defines the particle properties such as color and size.
Auxiliary
Emit particles from another particle system.
Force
Basic physic like gravity, wind etc’.
Turbulence
Displace the particles with a smoothed random map.
Field
Deform the particle space in may ways, such as spherical field, maps, black hole and more.
Replica
Replicates the particle systems. Copies the particles multiple times in different ways.
Light
Gives extra control over the shading of the particles.
Transform
Moves a particle system in space.
Model
Create 3D model particles.
Material
Define a 3D model material.
Deform
Deform a 3D model.
Group
Group nodes in the panel.
Clone
Create a new branch from a given setup.
Source
Create a basic source to be used with other nodes.
Physical
Apply physical attributes to the particles.
Physical Forces
Apply physical forces to the particles.
Volumetric
Add 3D Volumetric Lighting to your scene.
Node Switches
Fast access to basic node properties, such as Solo, Shy and more. These are accessible from the effect control window, as well as from a contextual menu (right click) on the Stardust panel.
Visibility – Enable or disable the node.
Solo – When Solo mode is enabled on the main effect, only ‘Solo’ nodes will get rendered.
Shy – Effects who’s Shy switch is enabled will not appear in the effects controls window. effects are automatically shown when selected in the Stardust panel. effects are Shy only when the Shy switch on the main effect is enabled.
Helpers – When ‘Helpers’ on the main effect is enabled, this will control the node specific helper.
Locate – Center the node in the view on the Stardust panel.
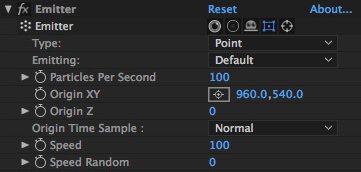
Emitters
The basics
As the name suggests, what this node does is emit particles.
Here you set the particle’s emitting properties such as speed, direction etc’
Many of the properties are shared between emitter types, such as the origin, speed etc’
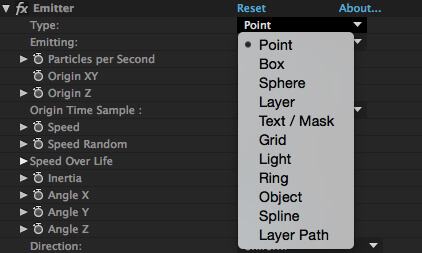
The following emitter types are available:
Point
The point in space where particles are emitted.
Sphere
Particles are emitted from a 3D sphere.
Box
Particles are emitted from a 3D box.
Spline
Particles are emitted from a 3D B-spline described by After effects lights.
Splines are created using After Effects lights, these lights can be filtered using the ’Starting with…’ parameter, and could be animated.
You can set all sort of behaviors related to splines, such as emitting types, properties of the particles along the spline. (Read – Layer properties).
When emitting from a spline You can control the particles over their life span, along the path of the spline, or a mix of the two. You can have particles emitted in different ways, evenly spaced along the path, or not, burst, continuous, or all at one. You can then trim, offset and attract the particles to the spline, using the ‘Move with emitter’ parameter.
Obj
Emit particles from OBJ vertices, faces, volume or surface.
When emitting from vertices of faces, you can emit all at once, and ‘paint’ the created outlines.
With the faces option set, you can set how many samples you get between each 2 face vertices.
More on the different types of Obj emitting in ‘Object properties’.
Text\Mask
To emit particles from After effects text layer or a mask, set the input layer in the ‘Layer properties’ group.
You can set all sort of behaviors related to paths and texts, such as emitting types, properties along the path. (Read – Layer properties)
Grid
You can choose between a rectangular grid and a sphere. You could also set an offset for the grid, so there is a shift in position from one row to another.
Light
Emit particles from After Effects light(s), filtered with the ‘Starting with…’ parameter.
You can inherit some properties form these light such as color.
Ring
Emit particles in a ring shape, oriented to the emitter movement.
Layer
Emit particles from After Effects layers. Some properties could be inherited from the layer such as color, size etc’
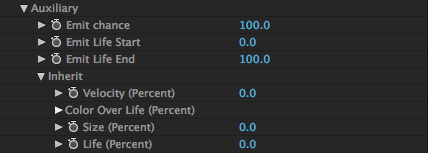
Auxiliary
Emit particles from another particle system. You could also emit auxiliary particles from another auxiliary and so on.
In order to emit auxiliary particles, you will need a parent Particle system, and then to connect the Auxiliary Emitter to a particle node. To do so, click and drag to create a new Auxiliary and Particle nodes, connect them to each other, and then connect the Auxiliary to the parent Emitter. You can also load an Auxiliary system from the Preset browser.
Once you set your Auxiliary, its parent emitter is used as the source position, and some properties could be inherited, such as life, color, size etc’
Speed
You can set the speed of the particles upon birth, but you can also use the ‘Speed over life’ graph, so change their speed as they age.
Emitting
You can choose from several emitting types, to send the particles on their ways.
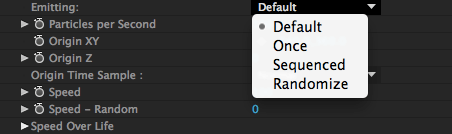
Default
Default emitting type for each emitter depends on it’s type.
Once
Emits only on the first frame. Point, Sphere and Box, will emit the according to the ‘Particles per second’ parameter value in the first frame.
With Grid, Spline and Text it will paint their path with particles.
Sequenced
Emits the particles in a sequence, if possible, e.g. in a grid , it will fill the grid one by one.
Randomized
Emits the particles in a random order.
Origin time sample
You can choose from sampling the origin property only on exact frame timestamps, or more then that.
Direction
Sets the initial direction of a particle.
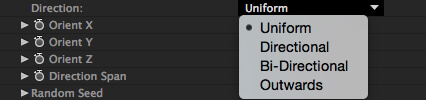
Uniform
Sends the particle randomly in some direction.
Directional / Bi Directional
Emit the particles in a specific direction set by the orientation properties and the direction span.
Outwards
This lets you emit the particle away from the emitter, so if you have a sphere, it will push all particles away from the sphere.
Mask outwards
For text / mask emitters, you can emit using the normal of the particle birth position along the path.
Layer properties
This group is used to set and adjust an AE layer input source. This applies to Text, Mask, Layer and Layer path. Choose the layer that is the basis for the Emitter, and then you set some relevant settings, such as emitting type for Text and masks, trim and more.
Layer
Choose a source layer, reference a layer for a mask it has, a layer emitter etc’.
Time sample
For layer emitter, you can choose the texture sampling to be current time or birth time.
Texture gets
For layer emitter, inherit color size etc’
Path frame
For text and mask, choose the frame to sample the base path. to keep continuity, paths have a master frame.
Emit type
For Text and Mask emitters, choose whether you emit from the volume and can control its depth with the Z size of the emitter, or its edges, weighted(evenly spaced) or not.
With edge samples you can set the distance of the samples, with the Path Subdivide parameter.
Path trim end
Trim an end of the path, this applies to mask, text, and splines.
Path trim
Trim the other end of the path, this applies to mask, text, and splines.
Path emit range
Emitter range for path emitters / Spline / Text / Mask. Choose a range for the particles to emit from: 0 emits from the start of the Path only, 100 emits from the entire range.
Path offset
Offset the path.
Path subdivide
Subdivides the path, the number is in pixels – the distance of samples along the path.
Move with emitter
Should particles move with the spline changes along life, or just emit and be free.
Grid properties
Set the properties of Grid emitters, it’s XYZ density, for a box, or its UV segments for a Sphere, you could also set a shift from one row of particles to another.
Object properties
Set a 3D model properties, click on the ‘Obj file name’ field, to open a popup to choose an Obj file. Then you can emit particles from it in different ways.
Obj Emit type
Choose from:
Edges – emit particles from the edges of the Obj face, subdivided by the ‘Line Subdivide’ parameter.
Vertices – just the actual vertices.
Volume – the model volume.
Face – one particle in the center of each face, combined with a particle render of faces, you can render a flat 3D model for graphic uses.
Surface – Emit from the surface of the Obj, you can choose whether to evenly generate particles, or in relation to the current Face size.
Edges Options-
Inherit edge size – Uses the edge size for the current particle, enabling to adjust particle size and orientation relative to the edge. To adjust the size, have a 3D particle and set the “Orient” to – “Normal”.
For models, either manually set model size on the Z axis to 100 units, or use the Normalize Scale, and Align to auto adjust it. Setting the size differently can create some creative looks. Please see the following preset as a sample for this feature: ‘Wireframe Cube’ ‘Wireframe Text’
Note: Edge size control works with External OBJ sources only (When having a model node connected to the emitter)
Path properties
For splines, here you set the number of samples along the spline.
Ring particles
Set the number of particles per ring, in the Ring emitter.
Offset Emitter Time
Per Emitter setting for initial state pre-run. Used for making setups be “evolved” as opposed to empty on the first frame.
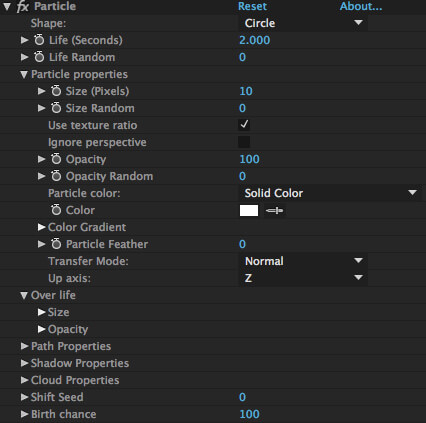
Particle
The Basics
This nodes sets the basic render properties of a particle, these properties may be altered later through other nodes.
Here you can set particle color, size, opacity and much more.
As mentioned in the Overview, you can change a particle properties when it start it life, over life, and with the other nodes along its way through the world.
You can choose from several particles types, from a basic feathered circle, flat rectangle, textured rectangle, cloud and more.
Some of these can rotate in 3D while other are from facing, you can also render faces, as in 3D model, that renders a flat render of the model.
Particle types
Most particle types share some common properties, that includes Start properties and over life properties,
Circle
A circle particle, that always faces the camera, it could be feathered, colored and more.
It could also render these without perspective, hence kipping its size.
Rectangle
These are flat colored rectangles, they could be rotated in 3D, or face the camera,
They could be oriented toward a goal, such as a light.
You can pick the anchor point for these, to get the scaling from a desired center point.
Cloud
Clouds are a bunch of Circles, that move together, you can set its unique properties under the Cloud properties group. As you can control of how many circles and choosing aspect ect’ you can get interesting effects using these.
Texture
These are textured particles, when choosing this you get to choose a source layer, and an optional second source layer for it’s back side.
You can control the source time sample and more, most of the Rectangle properties apply here as well, with the orientation etc’
Face
With the combination of Obj emitter set to render its faces, you can actually render its face, the colors, size, opacity ect’ are chosen as with any other particle type.
Model
Use 3D models as particles, on default it will create a cube, connect a Model node to use an Extruded shape, a primitive or an imported OBJ file.
Start group
Here you set some birth time properties of a particle, such as size and opacity.
Use texture ratio
With a texture particle, you can choose whether to keep the original aspect or not.
Ignore perspective
This control whether a particle ignores camera perspective affect on its size.
Particle Color
Solid color
All particles have the same color.
Color over life
Particle color is gradually changing as it ages and picked from the gradient.
Random from gradient
Particle color is randomly chosen from the gradient.
Loop from grad
Particle color is gradually changing as it ages and picked from the gradient. but starts at a random value, and loop through the gradient.
Color over path
In cases where the emitter produces a path, such as a Mask emitter, you can paint the particle along its path gradient, that is located under Path properties.
Mix life and path
Using the mix graph in the path properties, you can mix between over life and over path colors, as the particle ages.
From source
In some cases a particle can inherit it’s color from its emitter, such as a Light emitter, that has its own color.
Over life
Here you set some basic over life properties of a particle. like size and opacity.
Rotation group
This group is used to manipulate a 2D \ 3D rotating particle.
You can set a look-at, basic rotation, and rotation speed, and even rotation over life, a particle anchor, and to set if its 2D or 3D.
Orient to
Set the particles to look at a goal.
the goal types are as follows:
Motion : Aligned to the emitter motion.
Light \ Null : You can look at AE Light or Null, name filtered by the ‘Starting with’ parameter.
Emitter: The particles look at the birth position.
Motion(particle): The particles aligned to its motion.
Normal: A particle aligned to its normal, if it has one, such as a particle that emits from a Mask.
Anchor
Here you can set in percentage a particle origin, so it will scale from other point rather then its center.
Limit to 2D
For Textured and Rectangles particles, this limit them to 2D, only rotating in the Z camera axis.
Path properties
When a particle start its way from a path like a Spline, some properties could be set along this line, such as size and color.
You can also offset these properties along the path. e.g. you can set an size over path, and shift it along the path.
Shadow properties
A particle can have shadow(s), either a fixed one, if no light is present, or one that is projected using AE light, that is filtered by a chosen name.
You can tune the shadow size, blur, distance, opacity and color.
You can also choose from a preserve transparency shadow, that acts the same as layers in AE, that don’t write to empty pixels, or not, to get the desire effect.
Another option is to render a particle shadow only, so you could manipulate later with other nodes separately.
Cloud properties
A cloud is made from several circles travelling in a group. You can set how many will the group hold, and what the max hor/ver place they will take.
Texture properties
Here you choose a source particle texture, it’s dark side(that is the back side) and the method used to time sample the source.
You can choose to use the texture Alpha / Lightness only, meaning, you can colorise the textured particles with the particle colour.
Shift seed
When connecting to particle nodes to one or more emitters, you may or may want them to have the same random seed, by default they do, but you can use this parameter, to shift the seed to basically duplicate that emitter with the same properties only overriding its seed.
Use this when you want to emit different kind of particles from the same source.
Birth Chance
In cases you only want to emit some of the resulting particles, e.g. when using the previous parameter, you may want just a few to be larger, then you can shift the seed, and then pick only a small number to be big in size.
Space deformers
With this node, you manipulate particles properties such as their position colour size and more.
You can pull away the particles using a 3d sphere, box or an obj, or enclose them in one, you can then adjust affected particles properties such as colour and opacity. Other tools include space warps, such as bend and twist, Black hole, that attracts particles as they age to a point or points, displacement maps, can colour maps, and more.

Deformers types
Sphere / Box / Obj
With these deformers you can pull, push, enclose the particles , and affect other properties such as colour and size. The basic calculation, is projecting the particles out to the shape or in to the surface of the shape.
You can have multiple deformers, by having several nodes, you can also have multiple origins if you use nulls as origin sources, optionally filtered by name.
Grad / Radial grad
These deformer gradually affect the particle properties. This can be used for example, to create a fading reflection effect.
Bend / Strech / Twist / Spiral
As their name suggests, you can distort the particle space, in many ways.
Maps
You can set displacement maps and color maps, to alter particle properties. You can choose from built in maps, for ‘over length’ that you can them map in different ways, or use AE layer and map it to 2 axis or do a spherical projection.
Origin Use
With some of the deformers, you can have multiple origins at once, e.g. for a sphere, you can set the origin to be a Null or Light, and then for each of these Nulls you’ll have a deformer.
Other deformers, may use these multiple source in a different way, a black hole would attract each particle to one of the origins.
Amount
This is the global control for the Deformers, this will set the overall effect of it.
Basic
Here you set some basic properties of the fileds, such as it’s size, orientation and more.
Feather
This is he amount in percentage, that will fade from the effect to the previous state,
Randomize
Give each particle a random amount value, of the effects.
Enclose
For Sphere/box/Obj it will reverse the effect, e.g it will enclose all particles in a sphere field, projecting them from the outside of the sphere, on its face.
Projection type
With Obj field, it will set whether the projection will be the nearest polygon surface or the furthest, as in some cases there could be more then one polygon. e.g. if you have a model that consist of 2 spheres, one inside the other, when projecting the particles on it’s surface you can either hit the inner sphere, or the outside, with this you can choose.
Affect
Here you set what will be affected, such as position, opacity and blur.
Axis
For Bend, twist, strech, you can choose whether its distorting on a certain axis, or rotated freely.
Deformer over life
You can set the effect over a particle life, so for a black hole, this will set it’s travel from the original position and into the black hole.
Apply
Here you apply some properties to the affected particles, like it’s new color, or rotating and scaling it’s position in accordance to the field origin.
Maps group
With the maps group you control the basic properties of a displacement map. You can control many properties, and since its a modular effect, you can go and add more maps, to alter the particles position and looks.
Type
This sets the basic map type, a graph is an ‘over length’ graph, that can be mapped to space on one axis, and then could be used to map a property. A graph could also be color that is used to paint the particles, it a gradient that can be mapped in space on one axis. The other option is layer which takes AE layer and project it on 2 axis.
Size Type
This lets you easily match the parent emitter size for this displacement map. So,e.g. if you have a grid that you want to paint, you can set the size to the emitter, and it will use the same values as the emitter, or you can have a free setting of the XYZ taken form the field size.
Layer
For Layer displacement maps, this is the AE layer that will be used.
Over length
This is the graph that will be used with a graph displacement map for position, opacity, size and rotation.
Color Over length
This is the gradient that will be used to paint the particles, with a graph displacement to affect color.
Affect
This will choose the affected property, such as opacity, color etc’
Project
You can set the axis that the projection will take place.
Apply axis
For position, it will set the affected axis, so for example you can project on the XY axis, to affect the XZ, or do a spherical projection and spherical displacement.
Turbulence
This node, let you create smooth noise and apply it in various ways to affect the particles properties, such as its position, color and size. You can choose from several types of turbulence types.
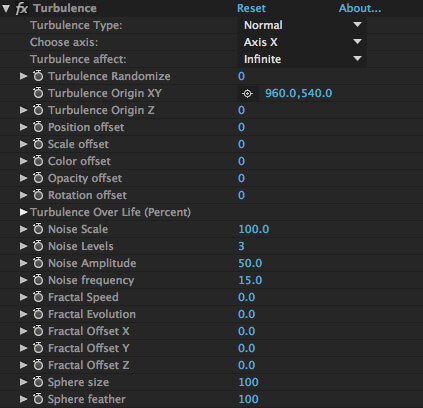
Turbulence type
You can choose to apply the noise in several modes,
Normal
A 3D noise, that will affect all axis individually.
Spherical / Spherical 2
This will use the noise to displace in a spherical way from the turbulence origin.
Axis / One side axis
You apply the noise on one axis only, or just one axis and one direction.
Choose axis
When you set axis / one side axis, this will set the affected axis.
Turbulence affect
You can set whether the effect will apply to all particles that are affected by this node, or you can limit it to a feathered sphere.
Turbulence Affected Properties
By selecting ‘Noise’ you can choose to store the generated noise in the particle for use in other nodes.
Turbulence randomized
Set here a random affect value for the particles, so not all will be displaced in the same amount.
Turbulence origin
For spherical and axis turbulence set the origin point to displace from.
Position / Scale / Opacity / Rotation offset
This will set the property affected, such as the maximum position offset.
Turbulence over life
You can set the turbulence to affect as the particle age. This is a zero to max graph.
Noise properties
Here you will set the noise properties, such as it’s scale, frequency and speed.
You can animate its evolution or offset it’s spatial position.
Sphere properties
When a turbulence only applies to a sphere in space, here you will set its size and feather.
Replica
This node let you replicate the particles in countless ways. You can choose from different types of replicating, and affect the particle properties.
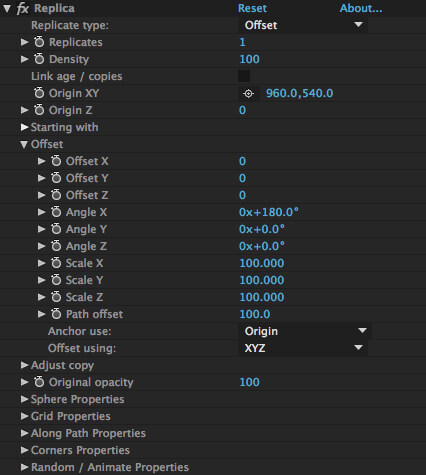
Replicate type
Here you set what method is used for replicating the particles.
Offset
With offset you replicate a particle by adjusting it’s properties based on the previous particle, so if you set an offset angle or scale, it will scale from one particle to another, resulting in exponential growth.
Grid
This will replicate the particles in a grid, defined in the grid properties.
Sphere
With this you could replicate the particles in a sphere.
Linear
You can replicate the particles based on an offset, that is relative to the first particle being replicated, so when you set scale or angle, it will set in relative to it’s ‘index’ in the replicated list.
Corners
A unique effect that replicates the particles in straight lines, randomly cornered. You can select from deferent types of lines, such as the Default, straight lines and Diagonal.
Path
Replicate the particles along a light path.
Spline
Replicate the particles along a spline described by AE lights.
Scatter
Replicate the particles randomly in space.
Flow
Replicate the particles in a flow-like way, using turbulence noise.
Copies / Density
The number of copies that will be created by the offset values, this will be combined with the density property that multiplies this value, so you can set a number of copies, and up the density, to get the replicated result more dense. You can then animate the copies to get interesting effects.
Link age / copies
This parameter let you easily animate the number of copies as the particle ages.
Origin
Here you will set the origin of the effect, for some types you can use the particle itself as the origin, bypassing this value.
Offset group
This group lets you set the offset between one particle to it’s copy, for ‘Offset’ type that would be from the last particle to current, and with ‘Linear’ and ‘Corners’ that would be a linear offset from the first particle, to current index. These transformation take in count the origin, which by default is the origin property.
Adjust copy
With this group you have a secondary control over the copies. You can add or subtract the position and angle offset, affect the opacity, or the orientation of the copy.
Original opacity
This will set the opacity of the particle being replicated in the first place, so if you would want to manipulate just the replicated result, you can turn the original particle off, and work from there.
Sphere properties
This lets you set the basic properties of a sphere replica. You can set it’s size, and number of segments.
With ‘Orient emitter’ you orient the replicated emitters to the origin of the Sphere.
The ‘Full Sphere’ parameter, replicates the entire sphere, regardless of the number of copies set.
Grid properties
Sets the basic properties of a grid replica, the ‘Full grid’ property fills the entire grid.
Along path properties
This group let you control the particle look based on its index in the replicated list.
So you can control the particle opacity, color, size etc’ based on a Stardust graph.
You can offset the affect of these graphs on the particles, using the ‘Offset’ parameter.
With the ‘Color mix Path / Life’ you can mix between the original particle color and the replicated result applied the color from the gradient.
Corner properties
Here you set basic properties of ‘Corners’ replica.
The maximum number of corners and random of this number in percentage.
Extra properties
With this group you will set some more advance properties to get extra control of the replicates, you can add randomness to the number of copies, and the copies themselves.
You can have a graph to control the number of copies, and trim them.
Copies random
This will set a random number of copies per original particle.
Copies trim
This property let you trim the copies from the start of the list, so if you have 100 copies, and you trimmed 10 percent it will not render the first 10.
Copies chance
You can have a random applied to whether a certain copy will be rendered or not,
Origin type
Set whether the replica is using the origin on emitter based, which is the defaul, taking the origin property as its anchor point, or the particle birth position.
Random scale
Randomly scales the particle size of the replicates.
Random rotation
This property adds randomness to the rotation offset.
Random position
This property adds randomness to the position offset.
Random opacity
Randomly changes the opacity of the replicates.
Size over path
With linear offset, this will change the size of the particle world along the replicated path.
Trim over path
With conjunction of the trim parameter. You can set how much trim a particle replicated list will be as the particle ages.
Copies over life
Here you have a finer control over the link between a particle age and its number of copies.
Average distance
This will re-distribute the copies in a linear way, so one the replicated shape is set. You can force it to be evenly distributed.
Do not rotate
You can choose for rectangles whether they should be oriented or not to the replicated path.
Faces properties
Add faces between the particles.
Models and Materials
Model node
In the Model node you specify the 3D model and it’s attributes to be used as a particle instance.
Multiple Model nodes can be connected to the same Particle node, and they will ALL get instantiated.
To render the 3D model as a particel instance, set the particle type in the Particle node to “Model” and connect a Model node to the Particle node.
You can also add a single 3D model to the scene by simply adding a Model node to the setup, to better control its position and animation add a controlling Null Layer.
The following model sources are available:
File
Import an OBJ file, or an OBJ sequence to be used as a particle instance. To import , click on the File Name, choose an OBJ file and click “OK”. If the “import materials” option on the file import dialog was checked, Material Nodes will be created and connected to the Model node, Mesh/Material assignments will automatically be ganareated and will be available for viewing and changing via the Material parameter in the Model node. Also if you have an MTL file along the OBJ and some texture files, these will be imported to the comp and linked to the respective materails as well.
Primitive
A parametric primitive 3D model can be created. Choose from different types such as Cube, Sphere and more.
Text / Mask
Use this option to extrude Text or Masks from a source layer. After choosing the Extruded layer, you can control the extrusion depth and add Beveled edges to the extruded Model.
Choose between extruding a Mask / Text faces or edges.
Extrude Edges Width – Set the width of the extruded body.
Volume
Render volumes , connect a Volume node as an input to define its shape, you can use a 3D Null to position it, and attach a material node to define it.
Material
This parameter allows for assigmnet of materials to the 3D model’s meshes, as well as switching meshes visibility on and off.
When importing an OBJ file along with it’s materials, the materials to mesh assignments will be copied from the OBJ file, if such info exists.
Model Properties
Control global properties of the 3D models.
Note – it is always better to prepare the model in a 3D package, and export it with smoothed normals.
You can inherit transformation for the Model from a 3D Null Layer. To do so, choose a Null layer from the “Inherit Motion” layer popup .
Creare Null – Creates a 3D null and parent the Model to it using the Inherit Motion param in one click.
Normalize Scale- Normalize the mode size on the Z axis to 100 units.
Align – Align a 3D model to one of its sides.
Texture Mapping – UV maps can be added to 3D models. Choose between applying a Sphere and Planar mapping, and adjust the orientation of the mapping using a control Null.
Reflection Plane
To enable planar reflection, add a reflection plane to a 3D model, best used with a Plane or a Cube. Once enabled, set its relative position and orientation to the object. Enable Helpers to get a visual cue when tweaking this offset.
Material Node
Control the material properties of a 3D model. To make this node take effect, connect it to a Model node.
To assign a material to a model , you can either set an ID number, which will work best for simple models (with a small number of materials), or use the Material param in the Model node, this will let you choose a connected Material Node for each material in that model for finer control.
Material Type
Choose between a Solid , Transparent ( Additive ) material and Volume
Please refer to the volume render section in the user guide for the Volume options.
Diffuse
Set the basic properties of the material , such as diffuse colour and texture.
By default a material inherits its colour from the particle source as specified by the ‘Color from Particle’ parameter.
Roughness / Gloss
Set the glossiness / roughness of the material, with an optional roughness texture.
Gloss / Roughness – Switched from ‘Gloss’ workflow to the more common ‘Roughness’ workflow.
Reflection / Metal
Set the metalness / reflection of the material.
The reflected image is specified on the Environment Layer / Color set on the Main Stardust Effect.
Reflectors amount – Adjust the opacity of the planar reflections.
Environment amount – Adjust the opacity of the environment on this material.
Subsurface Scattering
Create materials with light scatter such as skin or wax.
To enable subsurface scattering, turn it on in the Main Stardust effect render settings.
Refraction
Refract the BG environment to create glass like materials.
Emissive
Create materials that are not affected by lights, such as a screen that emits its own light.
Bump
Set a normal bump map.
Normal / Bump Map – Convert a bump map (any grayscale image) to a normal map. Useful to create procedural materials inside AE.
Transparent Material
For Additive materials only, this set the Opacity, you can inherit the Opacity from the source particle or set it in the material.
Affect DOF – Makes transparent materials opaque when in the depth for the DOF.
Shadow Catcher
Makes a material opaque only to shadows, to easily composite shadows.
Texture Time Sample
You can choose from having all the 3D models texture to have the current comp time or, choose randomly per particle.
For best performance, when using random time sample, it is recommend to use only short layer sources(2 to 20 frames long), or render times will increase.
Studio Cam
You can create a specially named camera ‘Stardust Studio Cam’ , when switching to this camera, the Stardust view will only show the last selected Model node, this way you can manipulate a Model’s materials and deformers in a clearer way, you can enable the helpers to have a reference axis.
To easily create the Studio Camera, click on the Utility switch on the main effect and choose to create the Studio Camera.
Deform
Deform Node
With this node 3D models can be deformed in a variety of way, ranging from a simple bend and twist, to creating terrain like setups.
To apply, connect a Deform node to a Model node, and then select the deform type.
The following deformers are available :
Noise
Apply turbulence noise to the mesh, it’s somewhat similar to applying the turbulence node to particles, only it affects the underlying 3D model mesh points instead of the particles.
You can set a number of iterations, to get more ‘folded’ look.
Transform
Apply a basic transform to the connected model.
Sphere
Similar to the Sphere field, apply a spherical distortion to the model , either pushing the points outwards or inwards.
Bend / Twist / Stretch
As their name suggests, you can distort the particle space, in many ways.
Maps
Use another layer in the comp to displace the 3D model mesh.
Model defiorm
Deform along a path – Deform a 3D model along a path defined by a mask or AE lights. The axis that gets projected along the path can be set. Offset along path, twist and more can be animated.
Physical
Physical Workflow
The main steps to add physical particles :
● Add some particles and models
● Apply physical properties
● Optionally add some physical forces.
● Simulate
● Freeze the simulation.
● Optionally, add Fields and Effects to Dynamic particles post simulation.
Basic Setup
To add physical particles first add Particles and Models as you normally would , then connect a physical properties node to these objects , choosing whether they are Dynamic Or Kinematic objects. Next, turn on the simulation on the main effect and the simulation will start generating. Tweak params as needed, and when you’re done, cache the simulation and freeze it. Once it is in ‘Freeze’ mode, you can go ahead and change some settings such as color, and size without recalculation of the simulation after every change.
Fields and forces such as the Replica can be added to Dynamic Particles post simulation to add interesting effects. to do so, connect a separate branch from the particle node to fields and effects.
Setup using a preset
Create a new composition with a solid the same size as the composition, and apply Stardust to the solid. Save your project first, and then apply a Physical / Dynamic preset. Change the Simulation popup to ‘On’ on the main effect.
There are several sample presets under the Physical Folder in the preset window to help you get started.
Simulating
Once you have your particles set, change the ‘Simulation’ param on the main effect to “On”. by default ‘Auto Cache’ is on, meaning any change in your setup will trigger a regeneration of the simulation for all previous frames while rendering the current one. This ‘Auto Cache’ is great for lightweight, and somewhat short simulations, as it gives instant feedback on every change. When a change in the setup doesn’t trigger a regeneration of the cache, touch any node on the Stardust panel to invalidate the cache.
On a more lengthy or complex simulation, it’s recommended to turn ‘auto cache’ off and push the Cache button when an update is needed, to start caching from frame 0 up to the end of the work area.
Simulations need cache files. once you the simulation state is set to ‘On’, Stardust will set a cache folder near where the after effects project file is saved, and will write the cache files to that folder. you can safely delete this folder, as the data stored in it can be regenerated when rendering with simulation state “on”.
For more details about Stardust’s physics global settings, please check the User Interface section in this guide.
Physical Properties
To make Particles or models physical, connect a physical properties node. The physical properties node must be connected directly to the particle node, or in the case where a model node is stand alone and not part of a particle setup – directly to the model node.
Physical particles can be either Dynamic, or Kinematic.
In short, Dynamic objects physically affect others and get affected themselves, while Kinematic objects only affect others without getting affected themselves.
Dynamic Particles – These particles get their base position / size / speed etc’ from the emitter in the same way as non-physical particles. From that point and to the duration of their lifespan, they are affected by other physical particles and physical forces. once the generation of the simulation is done, you can add fields and forces to these particles to manipulate the result, such as coloring, or replicating .
Kinematic Particles – These particles behave exactly the same as non physical particles, with the exception of having dynamic particles collide with them without being affected themselves.
Simulate Using
To speed things up, you can simulate the particles as Sphere or Boxes. choose ‘model’ when you need the specific model shape.
Collide With
If no ‘particle to particle’ collision is needed you can use this param to limit particles to collide only with Kinematic objects , such as walls etc’
Friction, Bounce, Mass
Sets the basic physical properties.
Damp and Damp Forces
‘Damp’ will weaken the effect of the current forces for the current frame, and ‘Damp forces’ will weaken the effect of the forces applied on previous frames.
Randomize
To get more natural and organic looking effects, use this param to add some randomness to all the physical properties
Static Until Hit
This will try to keep the particles static until hit by another particle.
In some cases particles will start moving when their neighbours start moving.
Axis
You can choose to limit physical movement to a 2D plane instead of 3D space.
To see a sample of how to limit the Axis, please apply the ‘Stream’ preset.
Initial State
Save and load Physics initial state, you can save the entire physics state or per particle system.
Save State – Will save the current particle system state, you can use the Button on the main effect to save all states.
Use Initial state – You can turn on and off using the State.
Lock Initial State – Lock the current state from clearing.
Physical Forces
Dynamic particles are affected by world setting such as gravity, collision with other dynamic and kinematic objects and physical forces. while there are some basic forces that are inherited from the emitter, such as speed and angular speed, extra forces can be added, which can be animated over time and the particle’s life.
Directional
Apply directional force to the particles.
Spherical
Apply a force into or out from a point in space. The range can be limited to a radius.
Origin Use
Choose between setting a center point for the force or using a light(s) to set its position.
Sphere Affect
Either make this force have infinite range, and therefore affect all dynamics particles that are affected by this node, or limit it to a sphere by setting the sphere size.
Amount and Swirl
The amount sets the pull/push power into the center point, and swirl sets a swirling power.
Noise
Noise applies a smooth noise force to the particles. since dynamic particles change their trajectory over the simulation, this can create more interesting noise and swirling effects, unlike the regular Turbulence noise.
Noise Type
With the flow noise swirling effects can be created. for best results mix this with ‘Damp Forces’ in the physical properties.
To see a sample of the Flow physical force, please apply the ‘Flow’ preset.
Path
The particles will try to follow a path while colliding with objects along the way.
To see a sample of the Path physical force, please apply the ‘Maze’ preset.
Connect
Add constraints to physical particles. Choose between point constraint and spring, and several options on how to connect multiple particles / emitters. First / last particle in a chain can be set to static, to easily create hanging chains.
Connect Using
Chain: Connect each particle to the next produced particle. Use this behavior to easily chain a line of particles.
Group: Connect each particle from emitter A to each particle from emitter B that are linked to the current physical force node.
Chain Groups: Connect the last particle in each group (emitter) to the first particle in the next group.
Limitations
Replica Node – The number of replicants in kinematic particles can not be animated throughout a simulation.
Tips
Try to avoid having many dynamic objects overlapping each other, as these may cause extremely slow processing and high ram usage.
With complex setups, disable the Auto Cache, and when caching switch to lower res preview. Since the simulation is calculated during rendering, switching to lower resolution would spare the render time without affecting the simulation result.
Object center of mass is the particle position, try to keep models centered using the center checkbox
For faster simulations, try working with simple geometries. i.e. set “Simulate using” to ‘sphere’ or ‘box’, or work with low polygon count models.
When duplicating a Stardust layer / comp with physical particles, it will point to same cache folder until you reset it. This is harmless as its only cache files for speeding up playback, and the simulation can always be regenerated.
Volumes
Create a Volume mesh from particles and models using the integrated OpenVDB technology. You can render these volume meshes as single models or as particle instances (when using models as sources).
Setup sample – Create or load a basic particle system, and make sure the particle types are “Model”.
Connect the Particle node to a Volume node, And Connect the output of Volume node to the input of a Model node which will be used to render the result. Adjust the Voxel size if the particles are smaller than the basic voxel unit.
Load a preset from the Volume folder to see some sample setups.
For faster processing, Volumes can be cached. To enable caching, turn on “enable cache”, found on the main Stardust effect under “Render settings”. Since The cache folder will be in the same directory as the project, The project must be saved before enabling the cache for the first time, to have a starting path.
Limitations –
Motion blur will only apply yo camera movement.
Time-remap – Cache has to be disabled.
Volume cache options
Off – No caching will be done.
On – Read and write cache, frames with no changes will be read from cache, new or modified frames will be written to cache.
Freeze – Read only, no writing or modifying of the cache, even if changes are made.
Create
“Create” mode governs the creation of basic volumes from different sources, and applying some basic properties to it. The volume’s source can be a Model node, Particle System Node, a VDB (Level Set) File or another volume node, You can connect up to 2 sources and apply boolean operations to them. The second input connector on the volume node can be used to distinguish between the inputs for some of the boolean operations.
To use a VDB file as source , have a Volume node with no inputs, and select the VDB source file under the File properties. You can then connect this source to other Volume nodes to apply filters / booleans etc’
Voxel Size – The basic size unit of the Volume. Objects smaller than this value will be disregarded.
Voxel Half Size – Threshold / How far from the edge of the volume the data is stored.
Smooth – Apply basic smooth filter to the volume. Use the “Filter” dropdown to choose between different types of smoothing.
Particle min Size – Force particle source to have a min size when converting into a volume.
Disable Source – Sets whether or not to render the volume’s source particles/models independently.
Mesh Properties –
Adaptive – Makes a simpler but less accurate mesh for faster processing. Use the adaptivity and ISO parameters to control the result mesh.
Smooth Normals – Calculate and smooth only the normals.
Static Cache – For complex, non-animating volume setups, use this switch to have a single frame cache to the volume mesh and save subsequent frames processing time.
Filter
Apply smooth filters, each with an iteration parameter. Ranging from fast and simple to complex and slow to process. Please experiment with the settings to choose what’s right for your setup.
Offset
Use to dilate and erode the volume. The “Open/Close” option will apply dilate and erode sequentially depending on the value being positive or negative, to smooth the mesh. (somewhat similar to applying shrink matte in two with positive and negative values one after another).
Noise
Cuts away pieces of the volume using noise. Choose between two types of noise: perlin and cellular. Limit the effect by a Gradient or a Sphere.
Advect
Performs volume advection using the flow noise.
(caution, this is very slow to process)
Volume Render
Create volume effects such as Smoke and Fire by loading a VDB file or creating a volume from any particle system or object in Stardust.
For a quick setup, load a volume preset:
For VDB file example – Presets / Volume / Volume VDB
Volume from particles – Presets / Volume / Volume Particles
To create and render a volume such as smoke manually, please do the following :
Create a Volume node, either to load a VDB file, or to convert a particle system into a volume object.
Connect it to a Model node and set the model source to “Volume” so it will control properties such as position etc’
Attach a material node to that model, and set its type to “Volume”, to define properties, such as Scatter and absorption of light.
The volume render quality is affected by its base resolution and the render quality.
Volume resolution – The volume resolution is set by the ‘Voxel Size’ parameter, found in the volume node. The lower the Voxel size, the more detailed the Volume object is, and more time consuming to calculate.
Imported VDB’s have their own native resolution, which can be resampled by adjusting the ‘Voxel Size’ .
Volume render quality – This controls the quality of the render , this is set automatically respecting the ‘quality settings’ under the render setting, and you can also manually adjust it using the ‘Volume Quality’ under the render settings.
Scatter
Input Channel – Set the VDB file channel to use: density or temperature.
Density amount – Affects the volume density and scatter. Scatter – how much light is scattered away.
Scatter Color – Tint the light scattered by the volume.
Scatter Color Gradient- Tint the volume using a gradient.
Gradient Input Scale – Scale the input values of the Gradient.
Input Min / Max – Remap the input values.
Enable Remap Density – Remap the density values using a linear graph.
Shadow Density – Affects the Density only of the volume’s Shadow, so it will appear more or less dense.
Shadow Darkness – Affects the volume’s shadow darkness.
Directionality – Changes the scattering direction.
Brightness – Affects the volume’s scattered light brightness.
Gamma – Overall volume gamma.
Absorption
Absorption Amount – Sets how much light is absorbed by the volume.
Enable Remap Absorption – Turns the absorption remap graph on or off.
Remap Absorption Density – Graph the absorption density for a non-uniform matter feel.
Emission
Input Channel – Set the VDB file channel to be used for emission, density or temperature.
Emission Amount – Sets the emission multiplier.
Emission Color – Sets the color of the emission.
Emission Color Gradient- Tint the volume emission using a gradient.
Auto Range – Auto map the input emission values to the range of 0,1.
Input Minimum – Manually set the lower end of the input range.
Input Maximum – Manually set the higher end of the input range.
Post Effects
Volumetric Lighting
Add 3D Volumetric Lighting to your setup.
To enable – Add a 3D Object in your scene ,a Light and the Volumetric Node. To have the volumetrics affected by the scene shadows, you will need to have a “Shadow Supported Light” (Spot or Parallel) and to enable the Shadows switch on it’s layer.
Amount
Sets the overall amount of the effect, taking into account the Light intensity etc’
Distribution
Affects how the effect is visible from different angles, either dependent of the direction of the view ot not.
Hotspot Brightness
Affects the amount of light near the light source.
Hotspot size
Affects the radius of the hotspot. It correlates to the Falloff distance.
Decay
Limits the Volumetric effect separately from the light , e.g. you can have a smaller area that is affected by the volumetric effect. this correlated to the Falloff distance.
Contrast
Sets the overall contrast of the Volumetric effect
Shimmer
Add gradient noise to the Volumetric Effect
Shimmer Scale
Sets the scale of the gradient noise.
Shimmer Phase
Animate the gradient noise over time.
Shimmer Mix
Gradually Mixes the Shimmer with the volumetric.
Shimmer World
Adds shimmer that depends on world position. When set to higher than 0, will cause a light to shimmer when moved.
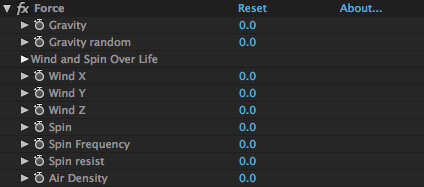
Loose ends
Force node
Here you will add some basic physic like forces, such as gravity, spin, and wind, you can also apply some of them as the particle ages. So if you added some spin, you can set the over life graph to affect the particle as it progress in life.
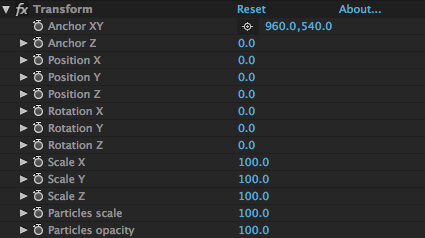
Transform node
With this node you can move, rotate, scale, and affect particles opacity.
Motion Node
Add extra motion to the particles, with this node you can move the particles on a pre-defined motion, such as circular motion, follow and orient particles to a light path and more.
Shading Node
You can have some extra control of the lights in your particle space, by default, if you turn shading on, you’ll get shading, but if you want to filter light names and apply different light properties per node, you can connect a light node to that particle system and fine tune it.
You can Also set an environment layer to use with Rectangles and Textured particles, to use this, choose a reflected layer and set its opacity.
Clone Node
Create a new particle system from any point in the flowchart, to use it, connect the Clone node to existing node in a branch, this will enable you to create a new Particle system, by connecting nodes to it.
You could also time shift the Cloned branch and reseed the emitter.
Source Node
Create a source to use with other nodes, you can create a source Layer, Obj import, Layer filter and more, once you set the source, you can modify the params, e.g with an Obj source, you can choose to use only some of the Obj properties, and you can choose the output param, e.g with a Layer source, you can choose whether it will be a source for an emitter, or a textured particle.
Layer Set , you can use this to set multiple layers in the comp as the source for textured particles. To use the Layer Set, add a source node, select the source layer(s) in the comp, then right click on the source node in the panel , and set it to the selected layers, Once the Later is set, connect the source node to a particle(Textured particles only) node’s input.
Group Node
This node enables to hide nodes in the Stardust panel inside groups to reduce clutter. it has no affect on the render .
To use, create a Group node, then select the nodes you want to add to that group, then either right-click on the Group node and select Add Nodes, or go to the Effect Control Window, and press the Add Nodes Button on the Group node effect.
You can then Collapse / UnCollapse the Group node, to show/ hide the nodes that belong to it, by using the contextual menu on the gourp node, double clicking it or using the “Collapsed” checkbox on the group effect.